Healthy soil is the foundation of a healthy ecosystem, whether that be your backyard garden or a redwood forest. In some ways, gardening is more about farming soil than it is farming plants. So how can you know how healthy your soil is? One option is to have your soil tested in a lab. This is a great option for larger properties in particular – $50 is a great deal for acreage of land, but when we’re dealing with a backyard garden, it doesn’t make as much sense. Luckily, we can learn a lot about the condition of soil using our most basic scientific instruments – our senses – and a few simple gardening tools.
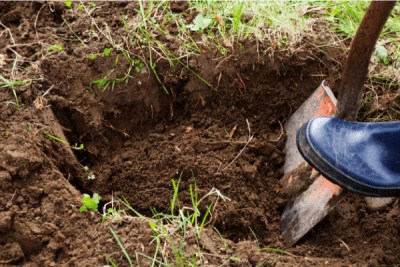
Head out to the garden and dig a hole that’s about 1 cubic foot – 12 inches deep, long and wide (if you have plans to dig a swale, rain garden or pond, dig your hole in that spot). Spread the soil you removed on a tarp or similar surface, and get ready to make observations and take notes on the following:
- Is the soil easy to dig or is it like concrete?
- Is it a nice dark brown indicating good organic matter or a less-than-optimal beige, gray or blue indicating low organic matter and lack of air?
- How does it smell? A scent like a nice, earthy forest floor indicates a healthy soil food web; whereas a foul or rotten egg smell may indicate poor drainage or aeration.
- Grab a handful of the soil and squeeze – what happens? Does it compact, crumble or sift through your hand? What do you think this means about how water moves through your soil?
- If you dug in an area with roots, like a lawn, do they go nice and deep or do they stop short, indicating compaction or a hardpan layer in the soil that needs to be broken up?
- Is there a variety of different insects? How many earthworms are there? Species diversity and 10 or more earthworms are good indications that the soil provides a healthy place to live
These observations alone can tell you a lot about the current conditions of your soil. Ideally your soil is easy to dig, dark brown in color, has a rich earthy smell, forms a ball with the texture of crumbling cake when squeezed, exhibits deep root growth, and hosts plenty of different insects. If your soil doesn’t yet match that description, don’t worry! Building soil health is really what gardening is all about.
The best way to nurture your soil and cultivate these conditions is to improve your soil organic matter content and maintain proper soil hydration. Check out our Carbon Gardening, Composting, Vermicompost, Drip 101 and Sheet Mulching resources for some tips.
There are a couple more tests you can perform to learn more about your soil characteristics:
The Mason Jar Test – Soil Composition
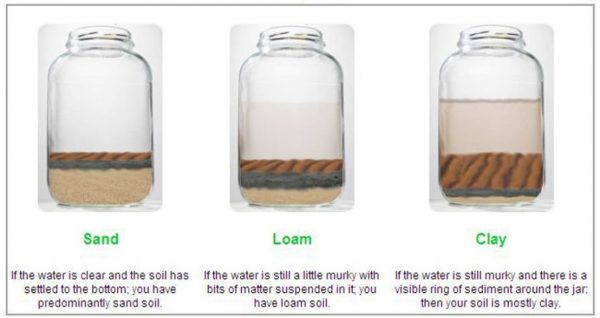
A home soil composition test is the best way to determine what your soil is made of and how it will perform in regard to water infiltration and nutrient availability, as well as what kinds of plants it will best support.
How to conduct your own soil composition test:
- Use a clear, clean, empty jar with a tight lid. A pint or quart Mason jar works fabulously.
- Fill the jar about half full of garden soil
- Fill the jar nearly to the top with water. Leave room for shaking.
- Tighten the lid and shake the jar for several minutes so that all the particles are in suspension.
- Set your mason jar soil test aside for several hours, so the particles have a chance to settle. They will separate into clay, silt, and sand layers.
- Once the particles have settled its time to read the results! Determine what percentage of each particle type you have in the jar and refer to the list below to confirm your soil type.
The basic percentages for the different soil types are:
- 30% clay, 60% silt, 10% sand = Silty Clay Loam
- 15% clay, 20% silt, 65% sand = Sandy Loam
- 15% clay, 65% silt, 20% sand = Silty Loam
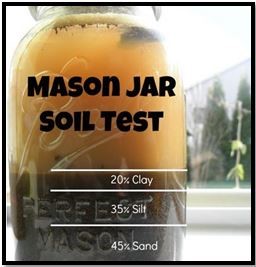
As seen in the mason jar:
20% clay, 35% silt, 45 % sand = Perfect soil conditions
Percolation Test
A home percolation test is a simple way to measure how quickly your soil drains. This information can help you determine how best to amend your soil to improve aeration, what type of plants may thrive there and how often to water them.
Follow these simple steps to conduct your own percolation test:
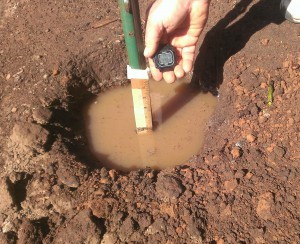
1) Dig a 6″-12″ deep hole in your future swale area.
2) Place a ruler (or stick marked in inches) in the bottom of the hole. The measuring device should reach the top of the hole.
3) Fill the hole with water several times to saturate the soil. This may take several hours or overnight in clay soils.
4) Note the time. Fill the hole with water. When the hole is empty, note the time and calculate how long it took to drain the hole.
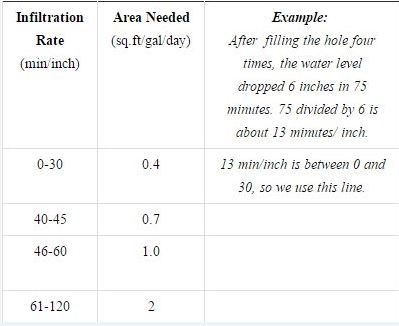
5) Convert this rate to minutes per inch (divide the minutes by inches- 120min/5 inches is 24min/in)
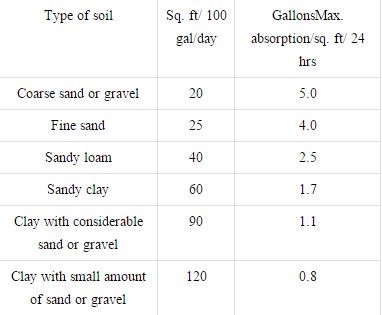
6) Find your percolation rate on the chart below.
