Welcome to Daily Acts’ Drought Resources page for Water Conservation! This is your one stop spot to find all of our webinars, how-to videos, and resource guides on saving water to help you make every drop count this drought year and beyond. We hope these resources can help you save our precious water resources while growing food, medicine, habitat, and community!
Sheet Mulching, Plant Selection & Irrigation
Resource Guides
We love to mix things up in our gardens, but there are a number of plants we tend to bring into a lot of our sites. If it ain’t broke, don’t fix it! Here are a few examples of plants we keep coming back to:

Yarrow: Achillea millefolium
This dependable native has soft, feathery leaves shaded by umbrellas of tiny flowers, which bloom all summer and into fall. It is great for pollinators, accumulates soil nutrients, and provides a number of medicinal uses. It also comes in a variety of colors to match any landscape. To ensure a full life and tidy appearance, trim back as needed, usually after bloom.
Plant Size: 1-2′ tall and wide


California Lilac: Ceanothus spp.
A native shrub available in every shape and size. Waxy evergreen leaves are adorned with dense puffs of lilac colored flowers in early spring, providing essential pollinator habitat when not much else is blooming yet. Great as an accent, groundcover or for screening. Place where it can express itself as it does not favor pruning. Variety shown here is ‘Joyce Coulter’.
Plant Size: 3′ tall and 5′ wide


Tricolor Sage: Salvia officinalis
A beautiful variegated version of culinary sage, which can be used either fresh or dry. Grows in low, spreading clumps and sends up purple flowers in spring and early summer, which are a favorite for many pollinators. This plant makes a great border for any garden, especially when mixed with other herbs. It is prone to rot if it stays too wet, so will last the longest in well drained soil.
Plant Size: 1-3′ tall & wide


California Fescue: Festuca californica
This small grass brings lovely blue-gray shades to the garden. A native that is very low maintenance, although fairly short lived. Group in mass for the best effect. It provides great habitat for beetles and seeds for birds. To promote a longer life, clean dead foliage by hand as needed, usually about twice a year.
Plant Size: 2-3′ tall & wide


CA Grey Rush: Juncus patens
An evergreen native that forms erect clumps of deep blue-green, round spears. One of the best plants for rain gardens, it thrives in boggy wet soil but is also very tolerant of dry summers. Looks best with occasional deadheading of old growth, and doesn’t mind a little irrigation in the summer either, although it will survive without once established.
Plant Size: 12-18″ tall & wide

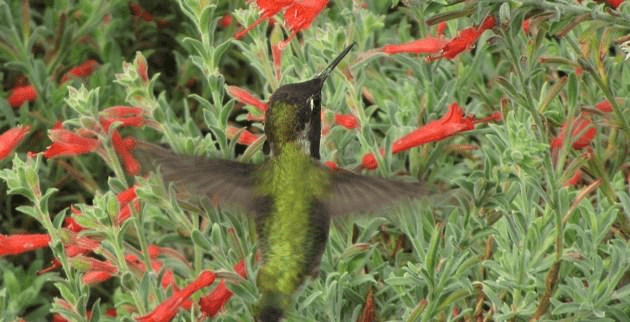
Beardtongue: Penstemon spp.
Evergreen foliage and nearly year-round blooms in many enticing colors, magenta to electric blue, make this a favorite filler plant. The tubular flowers mean that hummingbirds love it! Once established, it will prosper in low fertility soil with little summer water and can take full sun to partial shade.
Plant Size: 2′ tall and wide


Thyme: Thymus spp.
Elfin-sized leaves and stems weave a springy mat that does well as a lawn subsitute. Taller varieties are best for cooking, although creeping varieties taste okay too. Flowers form a lovely summertime icing of purple, pink or white and are loved by bees. For the plant to live its longest, trim back 1/3 per year after bloom.
Plant Size: 2-3″ tall and 1′ wide
Sticky Monkey Flower: Mimulus aurantiacus
This native is a spring and summer show stopper, with loads of salmon-orange flowers attracting pollinators. A perennial evergreen with dark waxy leaves that benefit from occasional pruning to refresh growth. Hybrid varieties sometimes maintain fuller foliage with less trimming. Also a favorite for hummingbirds and bees.
Plant Size: 2′-3′ tall & wide


Purple Spreader Verbena: Verbena x hybrid
A low maintenance and high impact groundcover blanketed with bright purple flowers through most of the early spring and late summer. This plant also comes in a variety of other colors, however purple is a favorite for butterflies. Very low maintenance, with some varieties like Superbena not even needing deadheading.
Plant Size: 6″ tall and 2′ wide
California Fuschia: Epilobium Canum
Like little firecrackers, these orange-red flowers explode over sage foliage throughout summer and early fall, attracting hummingbirds and bees. Can be kept attractive with light pruning as a groundcover. Nice when coupled with purple flowered perennials.
Plans Size: 1′ tall x 2′ wide


Seaside Daisy: Erigeron glaucus
This sweet little evergreen native has flat, pink, daisy-like flowers that the bees love to take a nap in. Low-growing and tolerant of poor soils, it provides an excellent groundcover. Can take some shade in more inland climates. Blooms nearly year round.
Plant Size: 1′ tall x 2′ wide
Deer Grass: Muhlenbergia rigens
Very low maintenance native grass, provides seed heads for birds and cover for beetles, lizards, etc. Forms a fountain creating structure and seasonal interest year round after all perennials have floomed.
Plant Size: 1-2′ tall & wide.


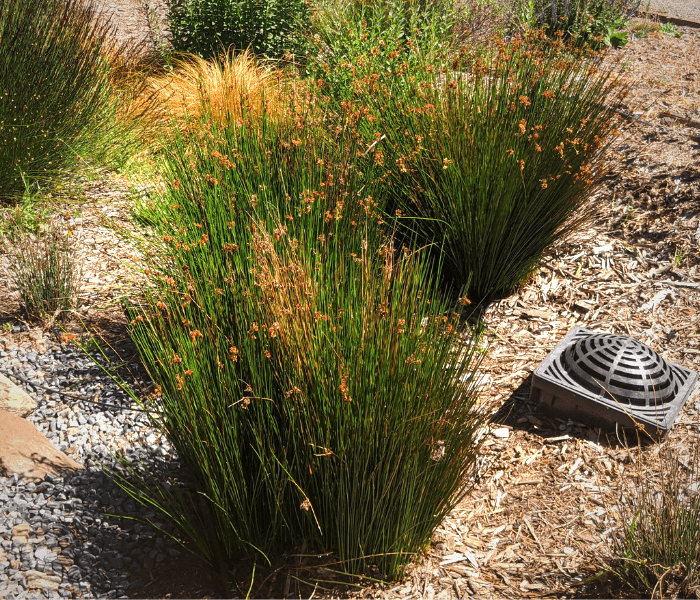
Sedges: Carex spp.
Most sedges grow as cascading mounds of narrow leaves that can be many shades of green to coppery orange in the summer. They grow well on the borders of rain gardens and can take seasonal wet conditions. Provides good hide outs for beneficial insects and beetles!
Plant Size: 2′ tall & wide
Cleveland Sage: Sativa clevelandii
This native shrub has grey-green leaves and whorls of lavender flowers in summer that are a favorite for hummingbirds. Strongly scented. Good for use as an accent plant or to tie in sage look through garden. Easy to grow and maintain, simply needs deadheading post flowering.
Plant Size: 3-4′ tall & wide


Coffeeberry: Rhamnus californica
A dense and round evergreen native shrub with big berries that resemble coffee. The fruit contains laxative properties and has long been used medicinally but IS NOT EDIBLE. Provides a wonderful shape and density for a hedge or screening. Can handle light pruning for shaping.
Plant Size: 6′ tall & wide
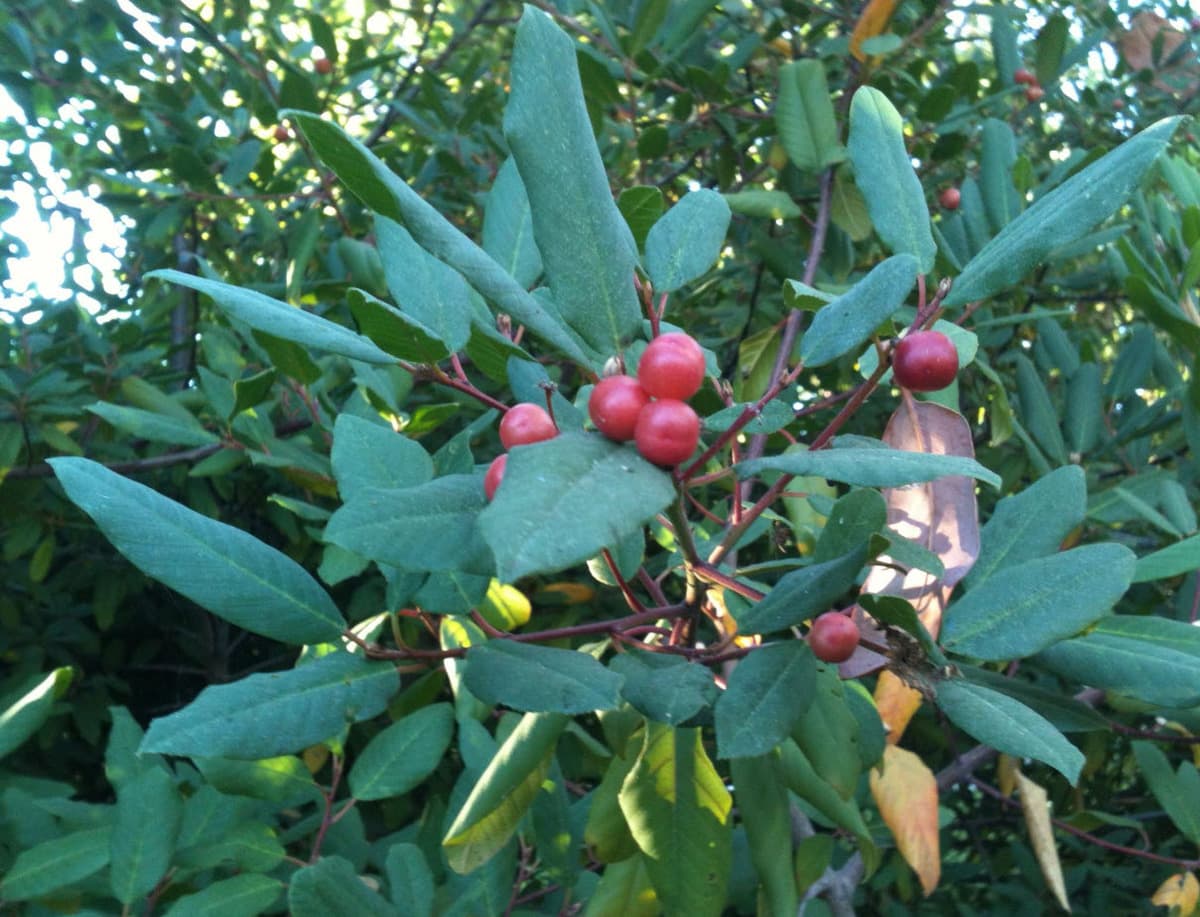
Toyon: Heteromeles arbutifolia
This California native is also known as Christmas berry for its evergreen foliage and bright red berries in the winer. Low maintenance and great near a window for bird watching, as its berries are a favorite winter food for wildlife. Fun fact: this plant is the namesake of Hollywood!
Plant Size: 10-20′ tall


Bush Anemone: Carpinteria californica
This evergreen California native shrub boasts beautiful white flowers with yellow centers, making it a great replacement for the thirsty Camellia. Drought tolerant and hardy, it can thrive in full sun to part shade, making an excellent screen.
Plant Size: 6′ tall & wide
Manzanita: Arctostaphylos spp.
These native evergreens have twisting mahogony red to brilliant orange branches and delicate clusters of bell shaped flowers that are a big hit with bees. Prefer well drained rocky soils, but are very low maintenance once established. Can be found in upright or trailing varieties.
Plant Size: 1-12′ tall & 4-10′ wide


Currant: Ribes spp.
A wandering deciduous perennial that can persist in part sun to shade, currants are a great option for understory. Attractive cascades of flowers come in many colors from red and pink to yellow, producing sweet-tart fruit, ripe in midsummer. Upright, sparse, vase-like form that needs pruning to stimulate new growth post fruiting.
Plant Size: 6′ tall & 4′ wide

Pineapple Guava: Feijoa sellowianna
A very low-maintenance evergreen shrub with showy edible flowers and gray-green foliage. Provides edible fruit with unusual tropical flavor. Nice multi-functional replacement for box hedges, or can be trained as a tree or for screening.
Plant Size: 6-8′ tall & wide


Persimmon: Diospyros kaki
Persimmons are a winter delight. Two types: apple shaped fruit (fuyu, seen here) can be eaten when still crunchy, while acorn shaped varieties (hachiya) should be eaten when very soft and ripe, almost gelatinous, or cooked or dried. Has brilliant seasonal color. Hardy and not prone to disease.
Plant Size: 20-30′ tall
Pomegranate: Punica granatum
Pomegranates can really handle drought once established. Large luscious fruit are ripe in late fall, early winter. A deciduous shrub, new growth appears bright red orange at first, then turning green, making it a great accent. Full in form it can be pruned up as a tree or kept as a smaller shrub.
Plant Size: 8-12′ tall


Fig: Ficus carica
A beautiful deciduous tree with twisting form, can be used as an accent in a garden providing deep shade with large palmate leaves, or bare sculptural trunk in winter. Figs can bear two crops of sweet fruit/year (depending on variety) and are easy to care for. Can be kept small with pruning but will get large if allowed.
Plant Size: 8-30′ tall
Strawberry Tree: Arbutus maritima
This evergreen tree displays bright red peeling bark that adds accent to the garden. Strawberry shaped berries are pretty and fun to eat. The tiny bell shaped flowers attract pollinators. Can be pruned to single or multi-trunk.
Plant Size: 15-20′ tall


Citrus: Citrus spp.
Citrus trees are frost sensitive, but will thrive against a warm, south-facing wall. Beautiful evergreen foliage, strong-smelling flowers, and winter-ripe fruit make them a nice landscape specimen, especially by a front door or pathway.
Planst Size: 8-30′ tall
Yerba Buena: Satureja douglasii
The crushed leaves of this native mint smell incredible! A low-growing ground cover, whose tendrils do not invade the garden like a true mint. Great for use understory or along rocky pathways as it can handle light trampling. Wonderful in tea.
Plant Size: 3″ tall by 2′ wide


Olive: Olea europea
This Mediterranean native adds both form and function to the garden with its evergreen sage leaves. Found in many varieties including small shrubs. The fruit is edible if processed and can be a little messy near a street or sidewalk. Great for screening, beautiful in the wind or to create a shady spot.
Plant Size: 4-30′ tall
Elderberry: sumbucus spp.
This charismatic CA native is drought tolerant but doesn’t mind having its feet wet. The berries can be eaten raw in small quantities (can cause stomach upset), but are delicious and medicinal when cooked into syrup, wine, jam, or tincture. While this plant contains many medicinal qualities, the leaves, green fruits and stems are toxic when eaten. This is also a great wildlife plant, attracting pollinators and birds to its 10-15’ tall, shrubby upright form.
Plant Size: 10-15′ tall and wide


Loquat: Eriobotrya japonica
This drought tolerant evergreen tree produces fruit that look and feel like apricot and that taste like a cross between cantaloupe and cherry drizzled with lime. With flowers in fall or early winter, fruits come as a welcome addition to a late winter diet. For those who are space limited, this typically small tree can also be planted in large containers.
Plant Size: 10-25′ tall and wide
How to Determine Watering Needs and Irrigation Programs
There are a number of factors that influence how long and how often we water our landscapes. Knowing a bit about your plant type, local climate and soil type will help you determine watering needs for optimal health and appearance. The leaf structure and native habitat of a plant are one of the key ways to tell how much water it will need. Plants with large, glossy leaves are likely to have evolved for shady, wet climates, whereas small, fuzzy, deeply lobed, or succulent leaves are all plant adaptations to help cope with dry, sunny weather. Local climate patterns, and even micro-climates within your landscape,will influence how much water needs to be supplied at different times of year. Your soil type will influence the rate at which water is applied to a landscape in order for it to infiltrate the root zone and encourage new growth without causing rot. The following sections describe each of these factors in more detail.
WUCOLS Plant Selection for Water Efficiency
The Water Use Classification of Landscape Species (WUCOLS), is a system that matches water supply to plant needs in an effort to increase irrigation efficiency and maintain landscape health and appearance. WUCOLS IV provides evaluations of the irrigation water needs for over 3,500 taxa (taxonomic plant groups) used in California landscapes. To look up the plant factor and watering needs for a particular plant visit http://ucanr.edu/sites/WUCOLS/Plant_Search/
Four categories of water use have been determined:
- High – contains species requiring the greatest amount of water during the summer months to maintain acceptable health, appearance, and growth, such as five-finger fern (Adiantum aleuticum), species that grow in deep shade or in creek banks with ‘wet feet’.
- Set irrigation program to water between 4-7 days each week during hottest summer months – assign a plant factor between 7-9

2. Moderate – includes plants such as cone flower (Echinacea spp.) that require routine moisture. Many eastern American species are in this category as they are used to summer rain. Most fruit trees are also in this category.
-
- Set irrigation to water up to 3 days a week during hottest months– assign a plant factor between 4-6

3. Low – these plants are considered to be water conserving (relative to a lawn) because they perform well with small amounts of irrigation water through the summer. Plants from other Mediterranean climates, such as strawberry tree (Arbutus unedo), and CA natives that are found in shadier habitats are often in this category.
- Irrigate 2 days a week, may require more depending on how established the plants are– assign a plant factor between 1-3

4. Very Low – are classified as needing no irrigation except during years of below average rainfall for the region, such as matilija poppy (Romneya coulteri). Many California native plants fall into this category, but may still need weekly watering during the first year of establishment.
-
- Irrigate 1 day a week during establishment, increase during hottest months for the first year or two.

Soil Infiltration Factors
Your soil type indicates both how quickly water can infiltrate the root zone and how widely it will be distributed. For recommendations on emitter flow rates based on soil type see below:

Sand is an extremely porous substrate that allows quick water infiltration due its small particle size and lack of organic matter, reducing its overall water holding capacity. Water regularly, as sand dries out quickly, and incorporate as much organic matter as you can to help hold moisture.
- Use higher flow rate emitter 1.0 GPH (gallon per hour) or higher and space emitters every 6” to achieve equal distribution throughout root zone.
Clay soil has a tighter particle size, allowing it to hold more water for longer periods of time. As water enters this soil it spreads out laterally in a wide shallow fan before moving deeper. Due to this slow infiltration rate, it is important to supply small amounts of water with regular but less frequent irrigation cycles to avoid dry, cracking soil or saturated roots in a slow draining bathtub.
- Use low flow rate emitter .5 GPH or below spaced every 12” to accommodate fanning.
Loam soil is a combination of clay, silt and sand that is porous, retaining moisture while moving excess towards drier spots through capillary action (just like a sponge). Finger test your soil for moisture on the days following irrigation to determine how often to water.
- Use emitters with flow rates between 0.5- 2.0 GPH for even watering and distribution and 6” or 12” spacing depending on your plant type (veggies vs. perennials shrubs).
Using CIMIS for Water Budgeting
The California Irrigation Management Information System provides records from different regions throughout California to provide seasonal data to inform irrigation efficiency. One of the main factors affecting the amount of water needed from month to month is the the evapotranspiration rate (ETo) in a given area, which is the rate at which plants evaporate moisture off leaf surfaces and topsoil. ETo is a measurement created by relative temperature and humidity and can be influenced by the following:
- Weather parameters such as solar radiation, air temperature, relative humidity, and wind speed
- Soil factors such as soil texture, structure, density, and chemistry
- Plant factors such as plant type, root depth, foliar density, height, and stage of growth
How to use ETo or CIMIS data to inform watering needs
- To determine your CIMIS ETo Zone, check the regional map located here: http://wwwcimis.water.ca.gov/App_Themes/images/etozonemap.jpg
- Now that you know your zone, use the Monthly Average Evapotranspiration Rate Chart below to determine water needs for your zone by month – note this is water that needs to be resupplied to plants via irrigation in inches (think rainfall) due to water loss through evaporation, which occurs in larger amounts during the hotter months.
- To use the water budget feature on your controller, program the setting for July to read 100% as this is usually the hottest month, then calculate the percentage of water needed each month using July as the indicator.
For example: May in zone 4 requires 5.27 inches for optimal plant health, so divide 5.27/ 5.89 (July inches) gives you 89%. So set your controller to 89% watering during the month of May.

*Please note that the CIMIS monthly averages were determined using turf grass as the measureable species. Be sure to factor in WUCOLS plant factor and soil type to give you the full picture on how much water is needed.
Programming Water Run Time
Given all of the information above, how do you move from WUCOLS, CIMIS and Soil Type to actually programming water run times? Follow these steps to help you determine how long and how often to water each hydrozone in your landscape.
- Add up the flow rates of all of your emitters on one zone (or valve):
E.g 32 emitters x 1 gallon per hour = 32 total gallons per hour
- Add up the square feet of canopy area of your hydrozone:
Eg. 16 plants x 7 sq ft = 112 hydrozone square feet
- Now take the flow rate per hour (32) and multiply it by 1.605 (this converts your gallons per hour to inches); then divide that by the area of sq ft.
E.g (32 x 1.605)/112 =.46 Inches per hour of equivalent rainfall
- Then, find your zone on the CIMIS chart and the average amount of water lost during July = 5.89”
- Next, consult WUCOLS to find your plant factor multiplier. E.g. Medium water use plant = .6
- Now multiply 5.89” (inches lost in July) x .6 (plant factor)= 53” of water needed in July / 4 weeks = .88 inches per week needed
- Finally, use this equation to turn inches per hour into controller station run time.
Take what you can deliver in inches per hour x 60 (minutes per hr.) and divide it by what you need in inches per week x days you want to water. See equation below.
E.g (.46 x 60) / (.88 x 3days) = 10.45 minutes, round down to 10 minutes
- Last but not least, go to the irrigation timer and enter 10 minutes 3 days per week! E.g Zone 1 run time 10 minutes, days to water Monday, Wednesday and Friday
Always remember to consider the following when choosing plants and programing water times to ensure an efficiently saturated and happy garden!
- Install similarly rated plants on the same irrigation line e.g. all Low WUCOLS plants.
- Use emitters with flow rates ideal for your soil type, using at least two per plant at the drip line.
- Adjust the amount of water being supplied for seasonal fluctuations in temperature.
- Monitor irrigation while it is in operation to ensure there are no leaks and check on plants for optimal growth.
How to Create a Water-wise Habitat Garden (pdf)
While many gardens can be designed around attracting particular kinds of insects or birds, it is also easy to plan and maintain your garden in a way that provides habitat and food year round for many and diverse migrating and stationary fauna. Be sure to consider the following when choosing plants and adapting practices to create a wildlife friendly garden.
What makes a flower attractive?
Pollen and nectar bring bees, butterflies and hummingbirds to the garden, because they are attracted to flowers that provide them with a food source. To provide a bountiful buffet that brings in the pollinators, plant selection for your garden should be based on the preferences of the bees and butterflies and take into consideration the time and duration that the flowers bloom.
Plant Native Species
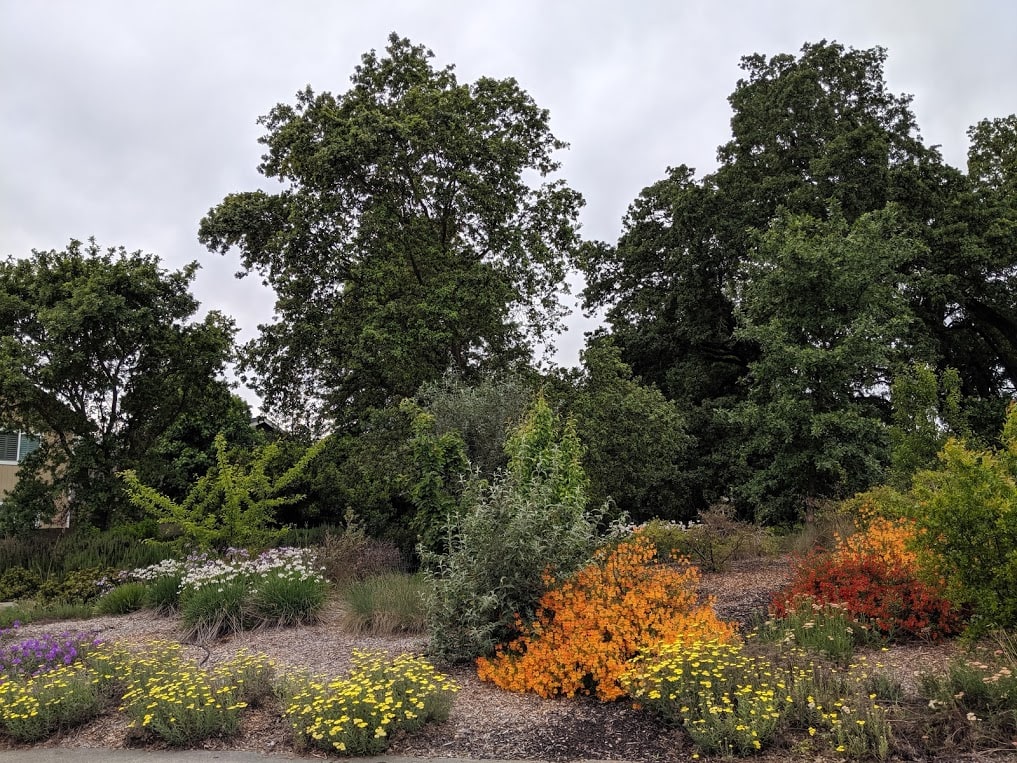
While gardens can be a mix of native and non-native species, planting native species does have several advantages. Native species are adapted to the local climate and soil conditions, making them easier to care for in a landscaped setting. Having evolved with native fauna over the years, native plants typically have symbiotic relationships with them. Putting native plants in your garden will provide food and shelter for native animal species, promoting biodiversity. In other words, if you want to attract native species of butterflies, bees and birds the best way to do it is by planting native plants.
Create Groups of Color
Butterflies, bees and hummingbirds will be attracted to a garden by a large patch of bright flowers; patches should be planted closely together- this cuts down the distance the pollinators have to travel as they fly between flowers and makes the pollination process more efficient.
Use a variety of plant forms
Plant a garden with all types of plants: annuals, perennials, bushes, trees, herbs, vines and grasses. Choose plants that grow to different heights and forms, providing structure for habitat, those that form seeds and berries, are a variety of colors, shapes, sizes and blooming times. Different species have different preferences!
- Gardens with 10 or more species of nectar and host plants attract the largest number of bees and butterflies
- If you are looking for a particular butterfly, choose plants that provide food and shelter for larval development to encourage butterflies to stick around and lay their eggs in your garden
- By having plants blooming throughout the spring, fall and summer seasons you will provide a continual source of pollen and nectar to native species of butterflies, bees and other insects which will in turn provide food for birds.
- Shrubs and trees are important to have in a garden because they provide night roosting spots and habitat for perching, eating, nesting and breeding for birds.
Take advantage of the sunshine: Sun is essential for butterflies as they are cold blooded insects and need to start the day off by warming in the sun. Planting nectar plants, placing large rocks and exposing areas of soil in sunny spots throughout your yard will provide inviting habitat for butterflies. Planting trees and shrubs can also help by providing wind protection as long as they do not shade out the flowering plants.
Low maintenance is a good thing: fallen leaves can provide both natural mulch for your garden and hiding places for insects a well as egg laying surfaces for butterflies. Avoid removing old branches or logs from the garden as these can also provide important habitat for beneficial insects and decomposers.
Leave areas of uncovered soil: Native bees tend to be attracted to less manicured gardens. Most solitary native bees are ground dwellers and will use these open spaces to make nests. Open areas in a garden can also provide warming areas for the butterflies.
Avoid pesticides: A healthy garden needs bugs. Many pesticides are toxic to bees, butterflies and other pollinators. By planting native plants in your garden you are providing additional habitat for beneficial insects that can help control pest populations in your garden.
- Planting hedgerows of certain species that are know to attract beneficials such as Baccharispilularis or coyote bush- over 250 species of insects use this plant – and Ceanothus ssp. will provide you with a thriving community of insects as your garden’s first line of defense against species like aphids. For example, native ground beetles make their homes in native bunch grasses by day and hunt for slugs at night.
Avoid pruning during nesting season: many birds will not revisit their nests after human contact, leaving their newly laid eggs behind. Keep our bird populations healthy by avoiding any large removal of branches on shrubs and trees from March- August each year.
Buckeye Nursery
2425 Old Adobe Rd, Petaluma
707-559-7081
www.buckeye-nursery.com
Mon-Fri 8-5
Broad selection of California native plants, meadow grasses and habitat friendly choices for sustainable garden environments, which use less water and require less maintenance.
California Flora Nursery
2990 Somers St, Fulton
707-528-8813
Hours vary by season.
www.calfloranursery.com
An unconventional nursery devoted to natives and habitat gardening that has an exceptional diversity of offerings with attention to local needs, conditions, and sustainability. Most plants are propagated and grown on site.
Cottage Gardens
3995 Emerald Dr, Petaluma
707-778-8025
Open Everyday 10-5
www.cottagegardensofpet.com
Specialty growers focusing on Perennials, Roses, Clematis, Rhododendrons, Grasses, Succulents and Edibles, as well as offering a wide selection of Pottery, Garden Furniture, Trellises and Gifts.
Emerisa Gardens
555 Irwin Ln, Santa Rosa
707-525-9644
Open Mar-Oct:
Tue-Sat 9-5, Sun 10-4
www.emerisa.com
A family owned retail nursery that grows over 2000 different varieties of plants, ensuring a beautiful, drought tolerant, deer resistant and habitat friendly plant palette that is sustainable too!
Greenman Nursery
2833 Old Gravenstein Hwy, (West of Todd Rd.), Sebastopol
415-710-2562
Open Fri-Mon 10-5 or by Appointment.
Old school organically grown fruit trees, berries, grapes, herbs, and veggies- over 100 varieties. With large demonstration gardens of native, succulents, grasses and large specimen trees.
Harmony Farm Supply
3244 Hwy. 116 N, Sebastopol
707-823-9125
www.harmonyfarm.com
Open Mon- Sat 7:30-6pm and Sun 8:30-5pm.
Committed to selling quality products Harmony Farms does not sell any synthetically compounded pesticides or fertilizers and believes that food, flowers and ornamentals can be grown organically without the use of toxic materials.
Luther Burbank Experiment Farm – Gold Ridge
7777 Bodega Ave., Sebastopol
707-829-6711
www.wschsgrf.org
Plant Sales every Weds 9-12
Open all year for self-guided tours. Docent led tours: call to reserve.
Mostly Natives
27235 Highway One, Tomales
707-878-2009
Wed-Sat 10-4, Sun 11-4
www.mostlynatives.com
A small retail nursery located in the northwest corner of Marin County, with a wide variety of native and non-native perennials, grasses, shrubs, and trees, along with certified organic veggie starts in both spring and fall.
North Coast Native Nursery
2700 Chileno Valley Rd., Petaluma
707-769-1213
www.northcoastnativenursery.com
Located in Chileno Valley, this nursery propagates regional California natives for water wise and sustainable landscapes, wildlife habitat and hedgerows, living roofs, and edible gardens. Seasonal hours and directions on website.
Occidental Arts & Ecology Center
15290 Coleman Valley Rd, Occidental
707-874-1557
www.oaec.org
Propagating a wide variety of native, drought tolerant, edible and medicinal plants, sales occur in throughout the year in April, May, and August. Check the web site for dates and times for sales, other tours and classes.
Urban Tree Farm Nursery
3010 Fulton Rd, Fulton
707-544-4446
www.urbantreefarm.com
Mon & Wed-Sat 8-5, Sun 10-5
Countless varieties of shrubs, grasses, vines, fruit and ornamental trees to consumers and landscapers. We deliver throughout the Greater Bay Area.
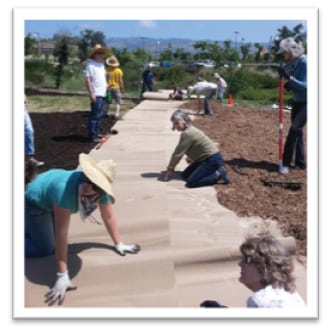
Sheet mulching is simple, natural, and effective for getting rid of your lawn and/or weed issues
Sheet Mulching is a landscaping method used to build soil, prevent weeds, and retain water. It’s sometimes referred to as a mulch lasagna because a compostable weed barrier such as cardboard, compost, and mulch are layered over lawn (or any soil area). Sheet mulching is a variation on nature’s way of building soil by accumulating and breaking down organic matter from the top down, and it creates a prime canvas for planting. We’ve recently altered our own sheet mulching process to be better in line with FireSafe Marin’s best practices for creating defensible space. With that in mind, we only use arbor mulch, we do not spread mulch in Zone 0 (0-5ft from the home), and in some cases we only spread 2” of mulch. That said, using too little mulch can actually encourage weed growth, so it is up to you to determine your fire risks and the level of weed suppression that you need on your site. A Washington State University Extension paper on using arbor mulch in the landscape recommends 4-6″ for weed suppression.
Benefits of Sheet Mulching:
- Saves 12-25 gallons of water per square foot per year compared to a traditional lawn, depending on the type of plants used. Sheet mulching the average 1,000 ft2 lawn could save between 12,000 and 25,000 gallons per year!
- Suppresses weed growth
- Reduces labor and maintenance costs
- Improves nutrient and water retention in the soil and improve soil structure
- Encourages favorable soil microbial activity and worms
- Improves plant vigor and health, often leading to improved resistance to pests and diseases
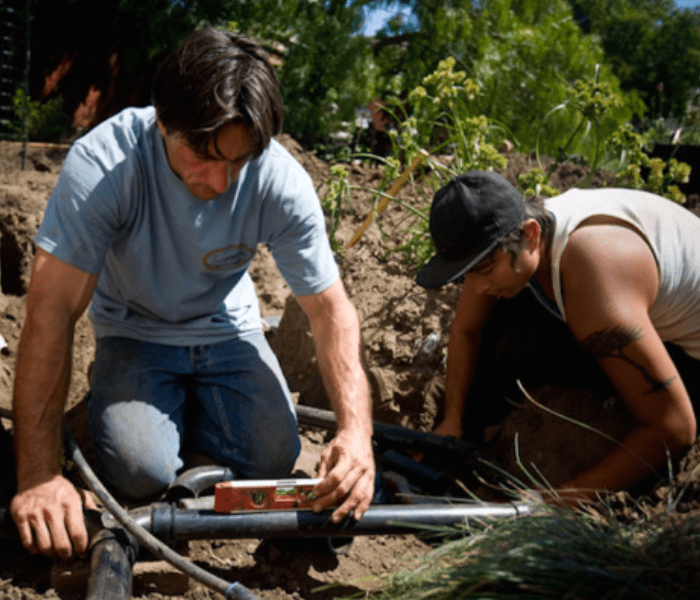
Step 1: Mow, Edge, Convert Sprinklers 
- Knock down or mow existing vegetation so that it lies flat. Remove only woody or bulky plant debris. Other organic matter can be left in place and will add nutrients to the soil.
- Edge the site, especially along hardscaping like sidewalks. This catches mulch spill over and prevents grass and weeds from reemerging around the edges. Edging should be ~5” deep (but can be more shallow around the base of trees) and should gradually slope back to the level of the rest of the landscape.
- Cap any sprinkler heads and convert one or more sprinkler heads to drip line irrigation if plants will be installed. Be sure to use a filter (often found inside the sprinkler conversion kit) and a pressure reducer to bring the pressure down to 30 psi.
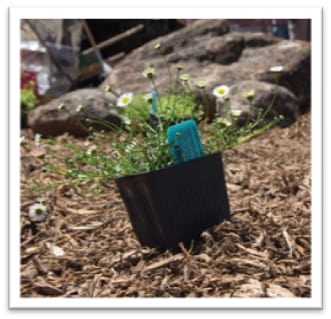
Step 2: Plant Large Plants
If you have large plants (5 gal. or bigger), plant them before sheet mulching and then layer over the planting area, being careful to avoid piling compost or mulch around the trunk of the plant. Note: it is okay to sheet mulch several months before planting and then plant large plants later.
 Step 3: Lay down the Weed Barrier
The first layer, an organic weed barrier, breaks down with time. The barrier should be permeable to water and air. Recycled cardboard (available from bike stores, large appliance stores, Sonoma Compost, and a multitude of other sources) is best, but a thick layer of newspaper will also work. Two or three layers may be required to achieve an adequate thickness, especially if using cardboard rolls or newspaper. However, if the weed barrier is applied too thickly, the soil can become anaerobic. The weed barrier works by blocking light, so be very careful to avoid tears or holes. Overlap pieces at least 6” to completely cover the ground without any breaks, except where there are established plants you want to save. Work in small sections so that the wind does not blow your weed barrier away before you can weight it down with compost and mulch.
Step 4: Add a Compost Layer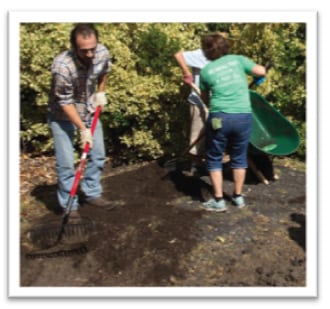
Jump start the decay of weeds and grass by adding compost or manure at the rate of about 50 lbs/100 square feet (1”-2” deep). Add any additional amendments needed, as indicated by a soil test. Optional: Soak with water to start the natural process of decomposition, especially if you’ll be planting soon.
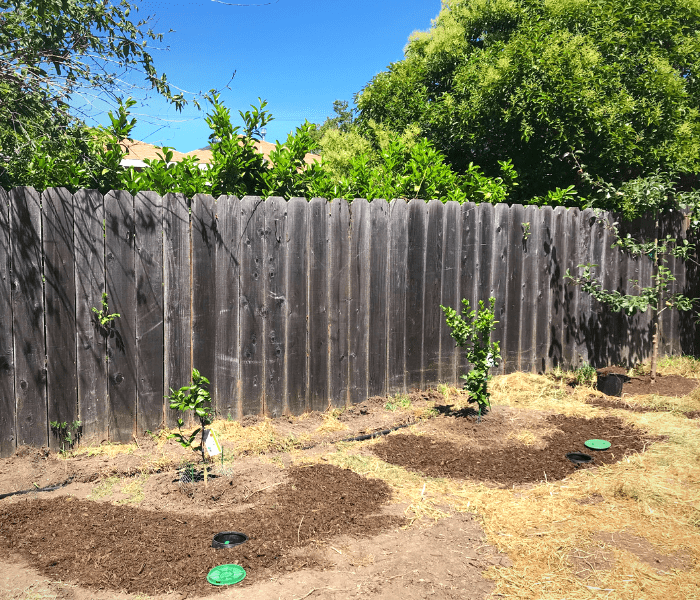
Step 5: Add Mulch
Layer arbor mulch at least 2” thick. For best weed suppression, use 4-6″ of mulch. Leave a generous opening for air circulation around the root crown of plants.
 Step 6: Plant
Punch a hole or cut an X in the cardboard and place plants in the soil under the sheet mulch. Be sure the roots are fully in the soil, not just the mulch. Important note: Planting in a newly sheet mulched project can result in reemerging grass/weeds. It is advisable to predetermine your plant layout and remove the grass/weeds from the desired planting location. Alternatively, you can wait a season or more for the grass/weeds to compost before planting.
Webinar Recordings


Retain the Rain: Sink it, Slow it, Spread it
Resource Guides
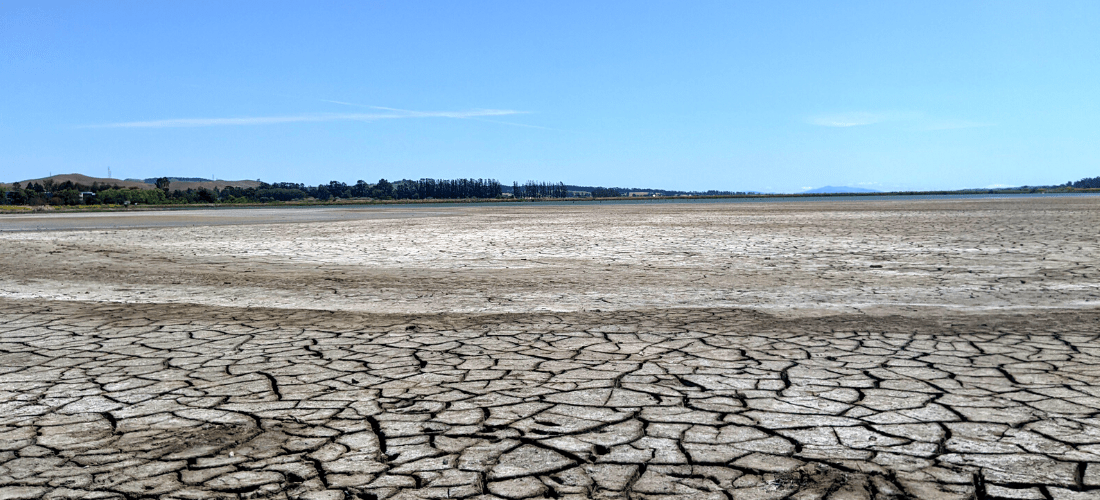
Water-wise isn’t just about using less water, it’s also about being creative with the water we do have — especially the free kind that comes right from the sky. As evidenced by the memorable storms of recent winters, rain events are predicted to become more severe and less frequent in our area, meaning that we’ll receive occasional surges of valuable but potentially destructive water. How can we re-envision our developed landscapes to more effectively utilize the gift of rain?

Here are three methods for DIY rainwater catchment that can help you become a water-wise wizard and a model to your friends and neighbors.
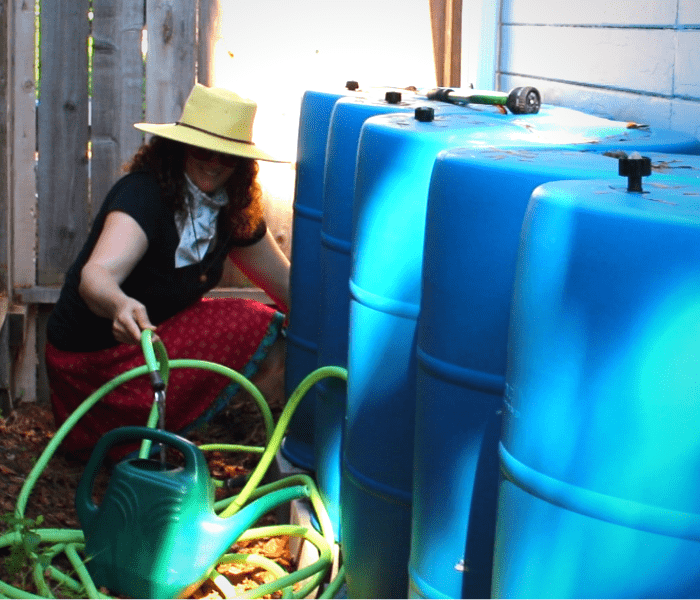
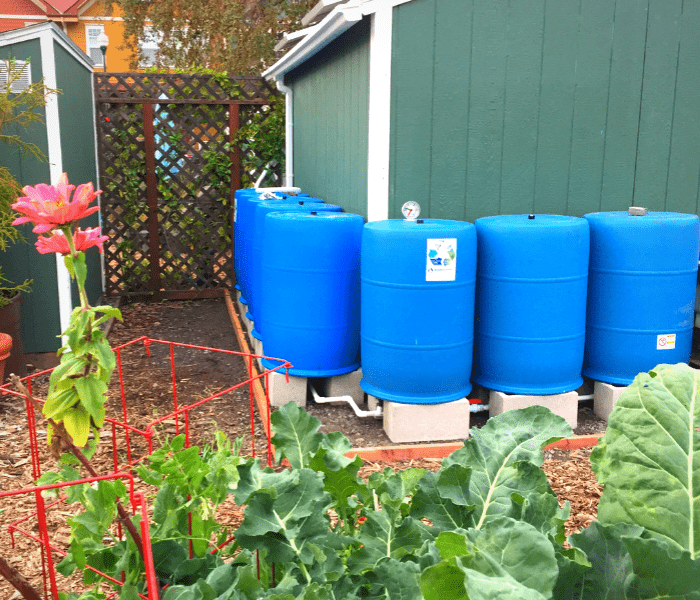
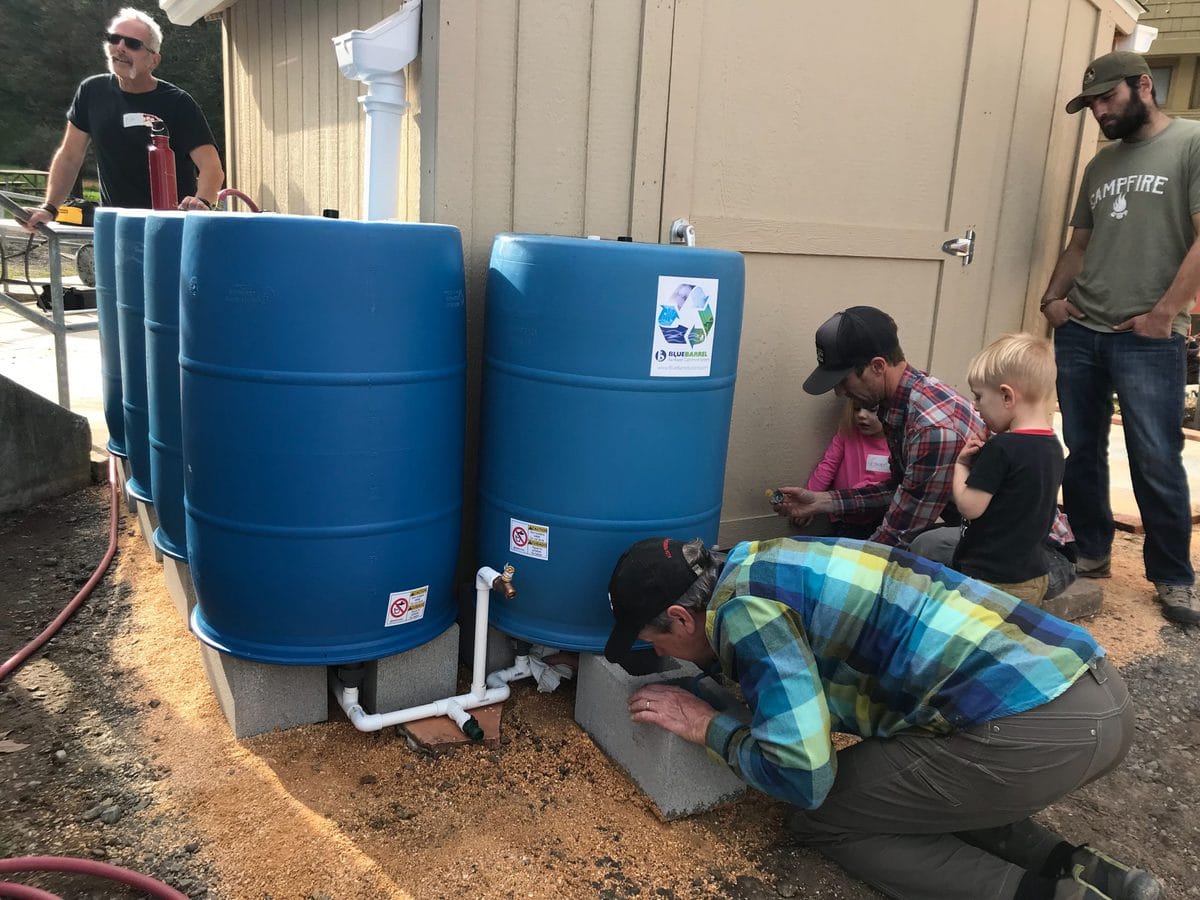
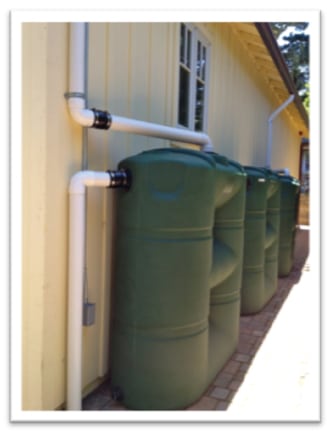
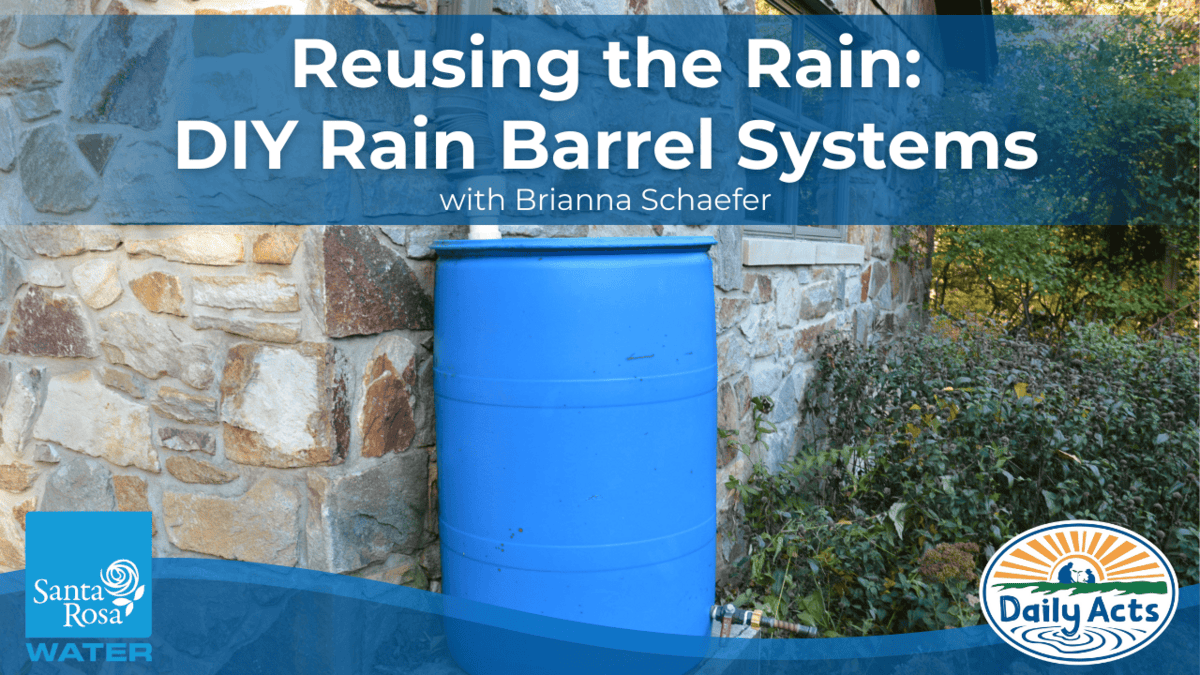
1) ‘Slow it’ with rain catchment systems
The simple installation of rain barrels, tanks or cisterns off of your home’s rain gutters is becoming a relatively mainstream concept, with information and materials readily available in your local hardware store. There are many ways to go about designing your system so that it can effectively store a whole season’s worth of rain, or just individual rain events. Depending on your storage capacity this free water source can be used for irrigating your landscape during dry months, reducing both your water bill easing your conscience at the same time. To give you a sense of how much rain you can collect: a 1000 square foot roof will shed 600 gallons for every inch of rain that falls!
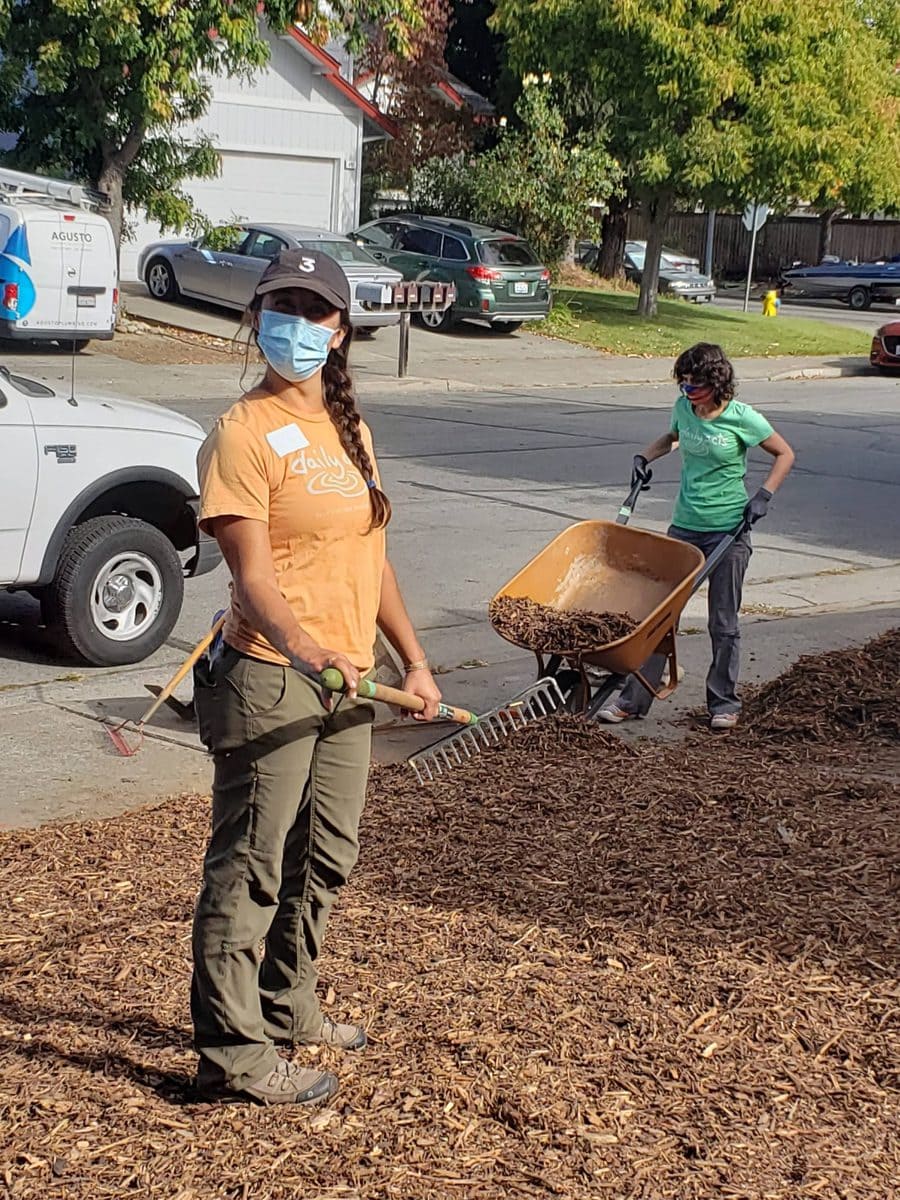
2) ‘Spread it’ with mulch applications
The unsung hero in the garden landscape: mulch provides numerous benefits besides the aesthetically pleasing ‘finished look’. Adding a layer of mulch to your garden can help cut down on erosion, minimize compaction of soil during heavy rain events, maintain soil temperature, replenish organic content of soil as it breaks down and prevent weed growth. Organic mulches like woodchips have a high water-holding capacity, which creates additional storage space for excess water until it can be taken up by soil and plants. Generally applied to lawns, sheet mulching is a process in which compost, cardboard and woodchips are added to the landscape in thin layers, creating more surface area to spread and capture rainwater on-site, while reducing weeds and increasing soil fertility as it decomposes.
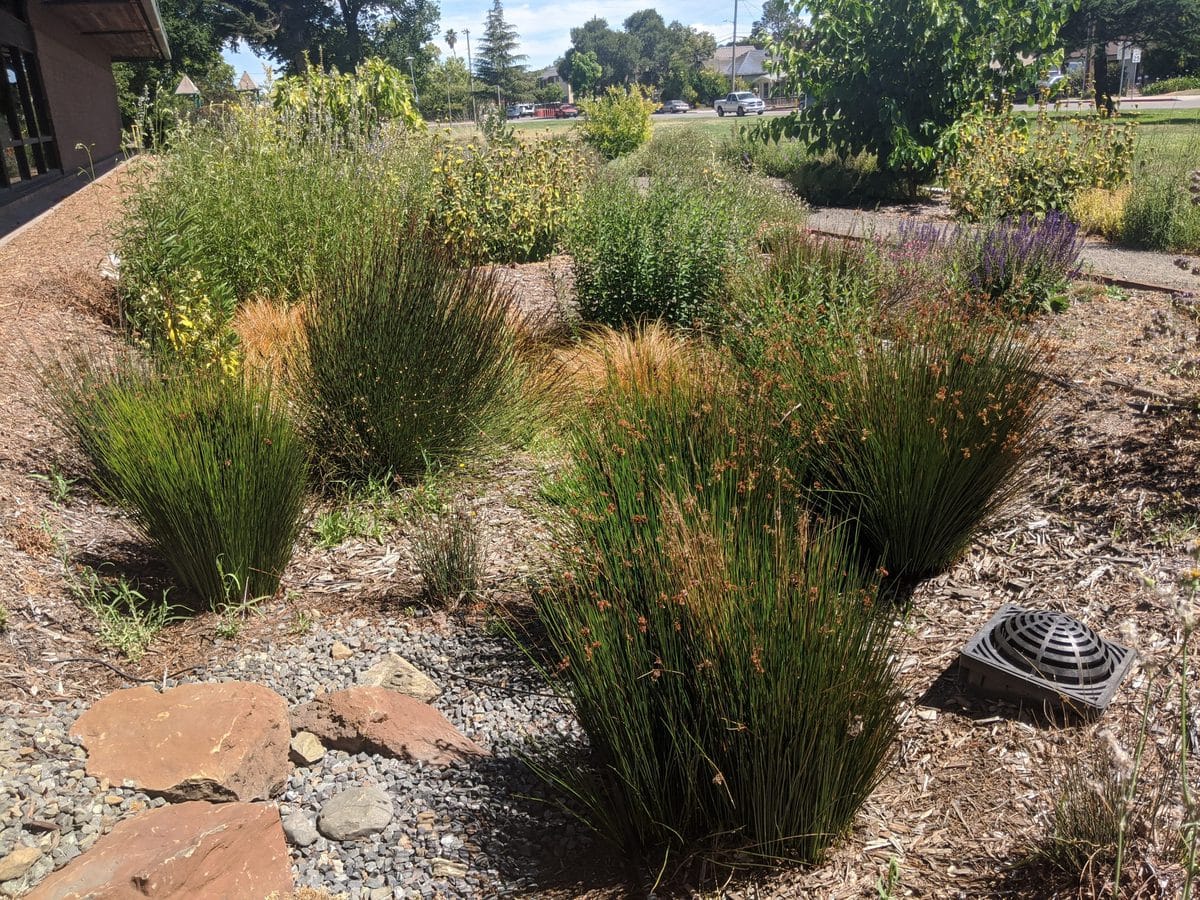
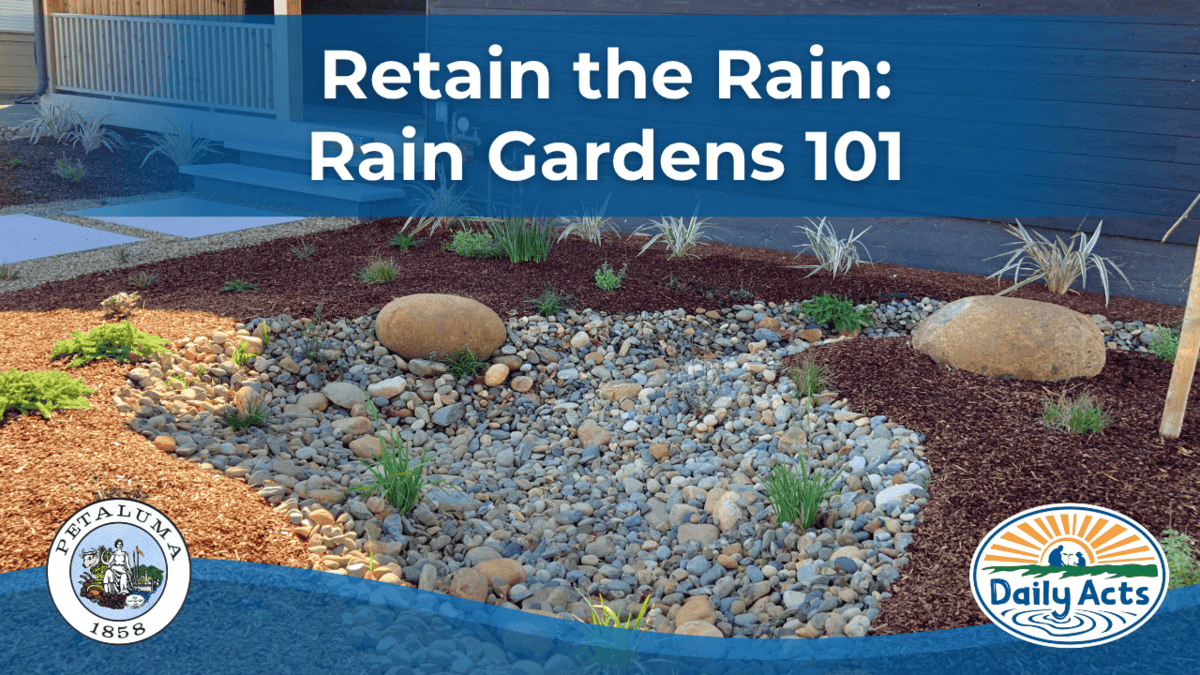
3) ‘Sink it’ through rain gardens and bio-swales
The addition of rain gardens and swales in your landscape offers two simple ways to increase stormwater capture and recharge our aquifers. These strategically designed low depressions and channels create holding places for water to collect and sink rather than run off over heavily saturated soils or impermeable surfaces. While both of these features can function well with a dry riverbed look, incorporating water-wise plantings will increase both the aesthetics and the benefits. The use of native plants in particular can provide much needed habitat, slowing the water and acting as bio-filters for harmful pollutants all at the same time. Be sure to place plants best suited to wet conditions in the center, moving from seasonally wet preferences into dry conditions towards the edges for best results. Check out this video tour of our rain garden at the Petaluma Library!
Where do you find the resources to make all your conservation dreams come true?
Many of our local municipalities in Sonoma County have incentive programs to help residents reduce water use both inside and outside the home. Programs like Petaluma’s ‘Mulch Madness’ (which delivers cardboard, mulch and compost to your door for free!), Cotati’s ‘Cash for Grass’ and Windsor’s ‘Efficiency PAYS’ program all provide incentives to reduce outdoor water use. The City of Santa Rosa’s ‘Green Exchange’ program also offers similar programs along with a rebate for installing a residential rain catchment system.
If you’re looking to grow your skills and gain some hands-on experience or guidance before taking the plunge, Daily Acts offers workshops throughout the year on rain catchment system design and installation, rain gardens, bio-swales and sheet mulching.
Watch this webinar recording on rainwater catchment with Jesse Savou of Blue Barrel Systems
Watch this recording of a conversation about sheet mulching and Petaluma’s Mulch Madness program
Download the official ‘Slow It. Spread It. Sink It. Store It!’ booklet (PDF)
 Collecting rain from the roof of your house is easy, practical and can provide long-term savings on your water bill. Rain catchment also reduces the amount of runoff that flows into creeks and storm drains, easing the burden on wastewater treatment plants and reducing the amount of pollutants washed into local streams and rivers.
With California’s seasonally wet climate, rainwater catchment can help stretch the wet season well into the summer months.
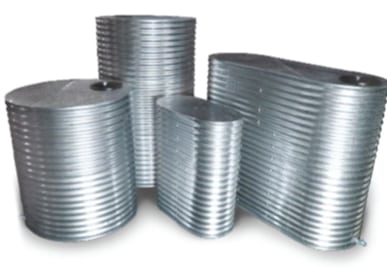
Types of Tanks and Barrels
Rain tanks and barrels are available in a wide range of sizes and shapes. Some are designed to stand flat against the house, some are round and some are like giant bladders that can rest underneath a porch or in an old swimming pool. Rain can also be stored in tanks underground.Keep in mind that for tanks over 5,000 gallons you’ll need to get a permit before installing.
Although the prices are coming down, rain collection systems are still relatively expensive. For most systems, you can expect to pay about $1 per gallon of storage. Some systems are more expensive than this, but it is also possible to set up low cost systems using recycled food storage barrels.
How Many Gallons Should You Collect
The size of your collection system will depend on how much space you have for tanks, what your budget is, how big your roof is and what your water needs are. Each situation will be different so it is up to you to decide how big you want to go. If you have the space, the money and the need for a lot of irrigation water, than a big collection system would be right for you. That said, starting small is a great way to go, especially with modular systems, which can be expanded over time.
Roof Materials and Health Concerns
Most roofs are safe for collecting rainwater, but there is potential for leaching from some roof materials. This is mainly important for collecting drinking water (which is not legal in California) but might be a consideration if you are using the rainwater to irrigate vegetables. There is no consensus about which roof materials are best (or worst) but brand new roofs can leach more pollutants than older, weathered roofs.
Roofs that are close to busy streets or large vineyards can collect car exhaust or pesticides from spraying, but a first flush system (see below) can be easily installed to shed any polluted water.
First Flush System
If your roof tends to accumulate leaf litter and other debris, then a first flush system can be installed to divert the initial flush of water that comes off the roof in a storm, keeping the rain tank free of debris, pollutants and harmful bacteria.
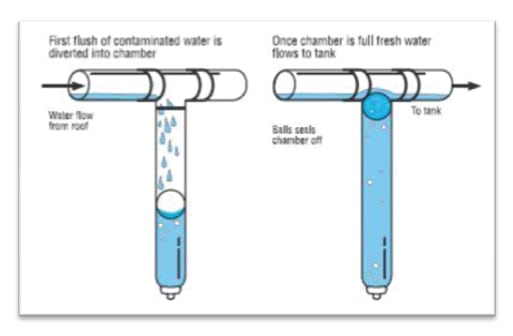 The first flush system is essentially a mini collection system, which fills up first before allowing the rainwater to flow into the rain tank. Once the first flush system is filled, a floating ball plugs the inlet, allowing the rest of the rainwater to go straight to the rain tank. The first flush system should be drained between major storms or if a lot of new leaf litter or pollutants have collected on the roof.
Calculating Catchment Potential
Total Catchment Potential (gal)= A x R x 0.6
The amount of water you can collect is determined by the catchment area and the amount of rainfall. The calculation that is most often noted is that you can collect about 600 gallons of water from one inch of rain falling on a 1,000 square foot roof. To determine your collection potential, first estimate the square footage of the roof you’ll be collecting from, then plug that into the following equation.
- A = catchment Area in square feet (see formulas for different shapes)
- R = annual Rainfall in feet = annual Rainfall in inches / 12
- 0.6 is a run-off coefficient. In rain events, some water is lost to evaporation and minor infiltration to the catchment surface. The coefficient represents the amount of water that runs off your roof into your system. While runoff efficiency differs depending on the material of the catchment surface, 0.6 is a commonly used coefficient.
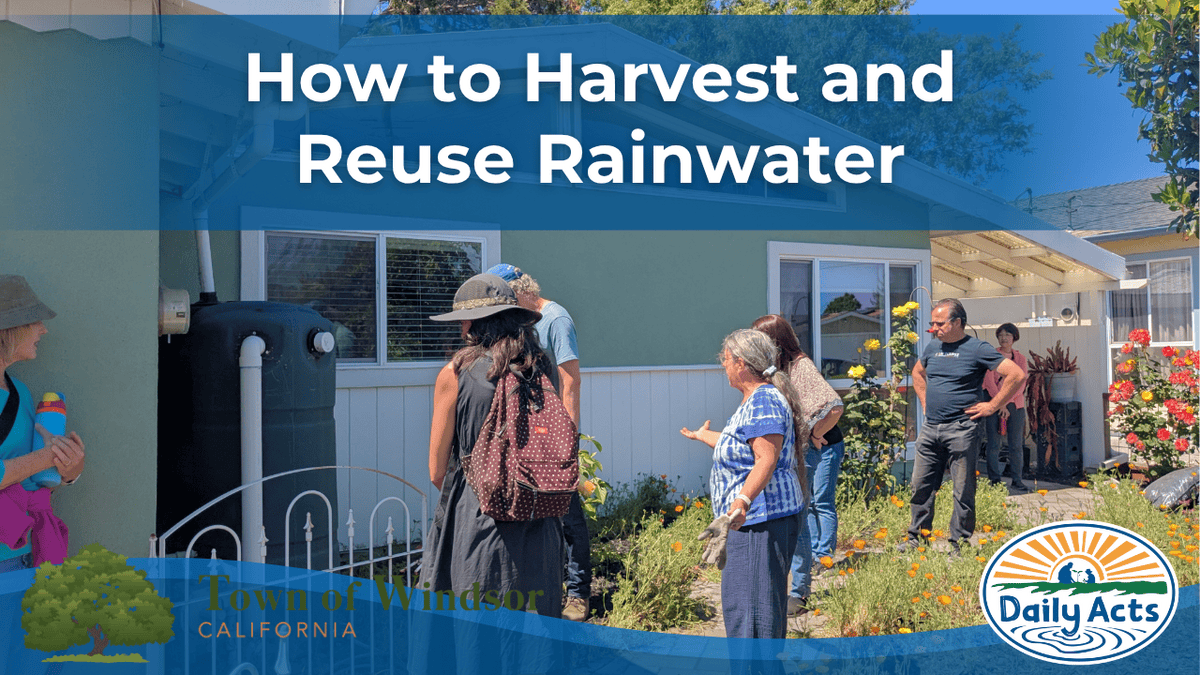
Irrigating with Rainwater
The easiest way to irrigate with rainwater is to hand water by filling up a watering can from the spigot on the rain tank or attaching a hose to the rain tank. You can also attach a soaker hose if you have enough pressure (hint: drill larger holes in the soaker hose to reduce the need for a high pressure system). The higher uphill your tanks are from the area you want to water, the more pressure you’ll have.
Rainwater can be run through drip irrigation but you’ll need to install a pump to get the appropriate pressure. This set-up works better with a larger rain tank, rather than smaller barrels.
Overflow and Safety
An overflow pipe should be installed to direct excess water to a rain garden, a swale or to a storm drain if necessary. Rain tanks and barrels should be strapped to the house to keep them from falling over in the event of an earthquake.
Additional Resources and Readings
Rainwater Harvesting for Drylands and Beyond – Brad Lancaster
Harvest More Rain in the Landscape with Rain Gardens
A rain garden is a planted depression in the soil which slows and infiltrates rainwater before it becomes polluted and erosive stormwater runoff. Usually, it is a small garden shaped like a shallow pool or ditch, which collects rainwater from a roof, roadway, or nearby hard surface. The plants are chosen to withstand extremes of moisture, as they may be in standing water for parts of winter and then must survive summers with very little moisture. The plants help absorb and infiltrate the water, so are critical component of a functional rain garden. Ideally, your rain gardens will be sited close to the source of the runoff and serve to slow the stormwater as it travels downhill, giving the stormwater more time to infiltrate and less opportunity to gain momentum and erosive power. It encourages water to walk across the landscape rather than run off. Rain gardens not only keep our waterways healthier, but they also recharge your soil with high quality water that your plants will love!
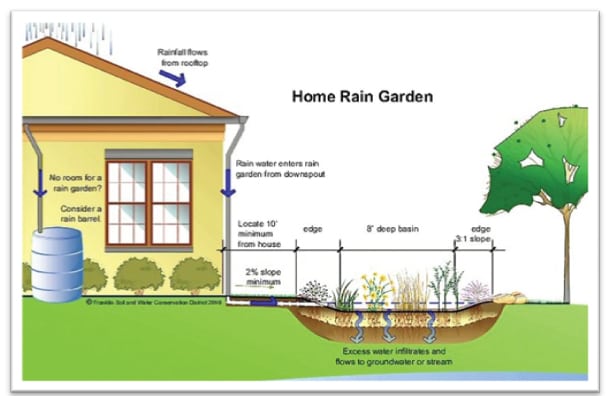
With a planted depression or a hole, a rain garden takes full advantage of scarce resources with the opportunity to be absorbed, integrated, and saved.
Design Considerations for Rain Gardens
Rain Gardens are best placed near the source of runoff although with enough margin so as to not cause damage to the foundation of the structure. Here are some other tips to consider when designing your rain garden:
- Avoid damage to roots and foundations; place gardens a minimum of 10’ away from any structure or shallow-rooted trees.
- Maintain a 3:1 or 2% slope until you reach the “edge” of the 8-12” basin to allow water to pool and percolate, preventing erosion.
- Keep it away from your septic system and drain field, rights of way, and underground utilities or service lines to avoid damage and contamination.
- Place in in full or partial sun, so as to ensure evaporation in the event of excess water pooling.
Benefits of Rain Gardens
There are many benefits to the installation of a rain garden on your property, including increasing your property value. Here are a few more to consider:
- Reduce the amount of polluted stormwater reaching our rivers
- Filter pollutants such as oil, fertilizers, salt, pesticides, metals and bacteria out of runoff
- Promote infiltration and recharge of the groundwater table
- Reduce local flooding potential
- Conserve water
- Create diverse habitat for birds and butterflies
- Reduce landscape maintenance in terms of time and money
Ideal Plants for Home Rain Gardens
Plants with deep fibrous roots tend to have a competitive advantage in a rain garden and provide the most cleaning and filtration benefits to the environment. Rain gardens are typically populated with natives or native cultivars as these are most well adapted to a locality. Listed below are a few great examples for our region to help you get started:
Grasses
Carex tumulicola- Berkeley Sedge
Juncus patens –Common Rush
Muhlenbergia – Deer Grass
Stipapulchra – Purple Needle Grass (California State Grass)
Shrubs
Solidagospathulata- California Goldenrod
Eriogonumsp.–CA. Buckwheat
Mimulusaurantiacus – Sticky Monkeyflower
Epilobiumcanum – California Fuchsia
Lupinusalbifrons – Silver Bush Lupine
Sambucusnigra– Blue Elderberry
Here’s another great article that sums up just what a rain garden is and how to properly tend to one:
A Guide to Building and Maintaining a Self-Sufficient Rain Garden
How to Harvest More Rain in the Landscape with Swales
A swale is a ditch that is dug on contour, meaning that it runs perfectly level across the landscape.
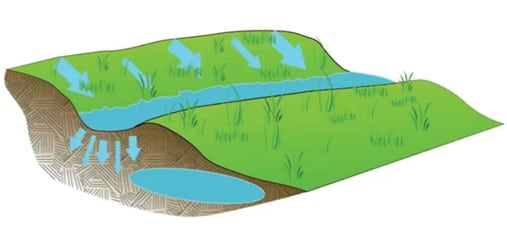 Swales are a great way to slow, spread and sink excess rainwater that would normally runoff.
Swales can be as big or as small as you like and should always have a spillway designed to shed excess water.
When a swale is dug out, the excavated soil is put on the downhill side of the ditch, forming a berm. This berm should be planted so that the roots help strengthen and hold the berm in place.
Swales harvest water which sheets downhill in a rainstorm and they can also be used to harvest water from downspouts or curb cuts.
Swales can be left as an open ditch or filled in with mulch.
Using an A-Frame to Measure Contour Lines
An A-Frame Level is a low-tech device that consists of three boards and a string with a weight on the end. You can use it to find contour lines.
To make an A-Frame Level
- Attach three boards in the shape of a capital “A” with two equal length legs
- Attach a string to the top of the “A” and hang a weight on the other end.
- Make sure the string extends beyond the crossbar of the “A”
 To Calibrate an A-Frame Level
- Place the A-Frame on a level (or nearly level) surface and mark the spot where the two legs rest
- Let the string hang down freely until it comes to rest against the crossbar
- Mark the spot where the string rests against the crossbar
- Flip the A-Frame around so that the legs are in the opposite spots
- Let the string hang freely and mark where it rests against the crossbar
- The midway point between the two marks on the crossbar is the level line
- Mark this level line with a big mark.
Using the A-Frame Level
- Now that it’s calibrated, you can use the A-Frame to find contour lines.
- Mark the location of one foot of the A-Frame and move the other foot around until the string hangs against the level line.
- Mark where the second foot rests
- Swing the first foot around until the string rests against the level line, and mark where the foot rests.
- Continue to walk the A-Frame across the landscape, marking each spot with a flag or stick.
Calculating Appropriate Swale and Rain Tank Size
The first thing that needs to be determined in swale design is how much rainwater will be diverted into it. If rain water is coming from the roof surface through a disconnected down spout, then rainfall in gallons can be predicted with the following equation:
A x R x 7.5 gal/ft3 = Total Rainwater (gal)
- A = Catchment area in square feet (length X width)
- R = Rainfall in feet = Rainfall in inches / 12
- There are about 7.5 gallons per cubic foot
Remember: You can collect 600 gallons of water per inch of rain falling on 1,000 square feet of catchment surface.
Once the number of gallons entering the swale has been determined, you can use the following equation to determine how big your swale needs to be to hold the majority of the water during a high flow rain event:
Total Rainwater = A x R x 7.5 gal/ft3 vs.
Swale Volume (gal) = 0.5 depth (feet) x width (feet) x length (feet) x 7.5 gal/ft3
- A = Catchment area in square feet (length X width)
- R = Rainfall in feet = Rainfall in inches / 12
- There are about 7.5 gallons per cubic foot
- Factor in the number of inches received in a high flow event
Remember to take the results of your Soil Composition and Percolation Test into account, as these will affect the swales water holding capacity, if the soils are slow draining.
A few more things to note about sizing your swales. Most residential properties will not have enough surface area to accommodate a high flow event, so take the swale volume calculation with a grain of salt. Regardless, all swales will need to have an overflow option to allow for excess water to leave the system without compromising the integrity of your swales (i.e. erosion).
Webinar Recordings
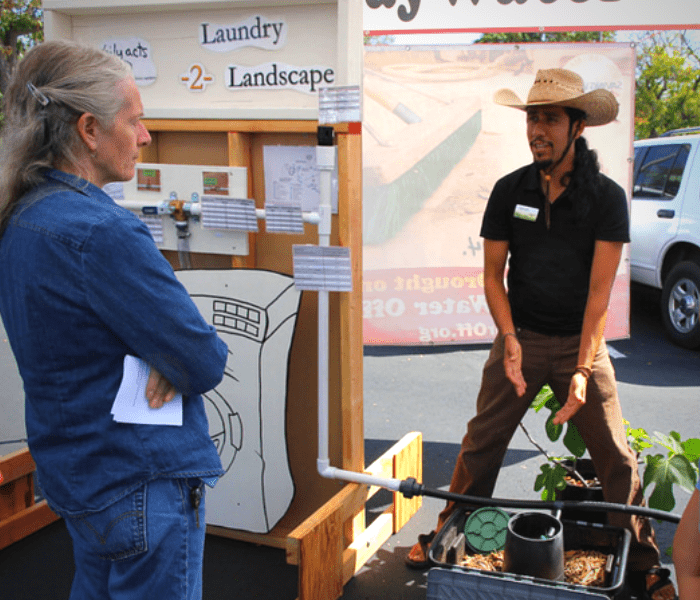
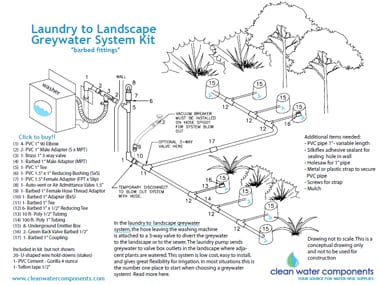
Install a Laundry-to-Landscape Graywater System
Resource Guides
 Did you know the average family of four uses 5,000-8,000 gallons of water annually in their washing machine alone? If 100 families installed a simple Laundry-to-Landscape greywater system, we could save 500,000-800,000 thousand gallons of water a year and put that precious water into our gardens instead of sending it the waste water treatment plant.
Daily Acts’ aim is to mobilize and support the installation of hundreds of greywater systems in Sonoma County. Are you in???
- Save water–depending on your water usage, your family will save thousands of gallons of water each year
- Save money – we will teach you to use the water that you’ve already paid for, again!
- Enhance Safety – your laundry will be safer for your family and the environment by using plant-friendly detergents and cleaners
- Create Beauty – you will increase the beauty and bounty of your home gardens by irrigating with greywater
- Build Community – build community by working together with neighbors and friends on your greywater installation!
- Build a Movement – get educated, engaged, and trained to share the goodness with others.
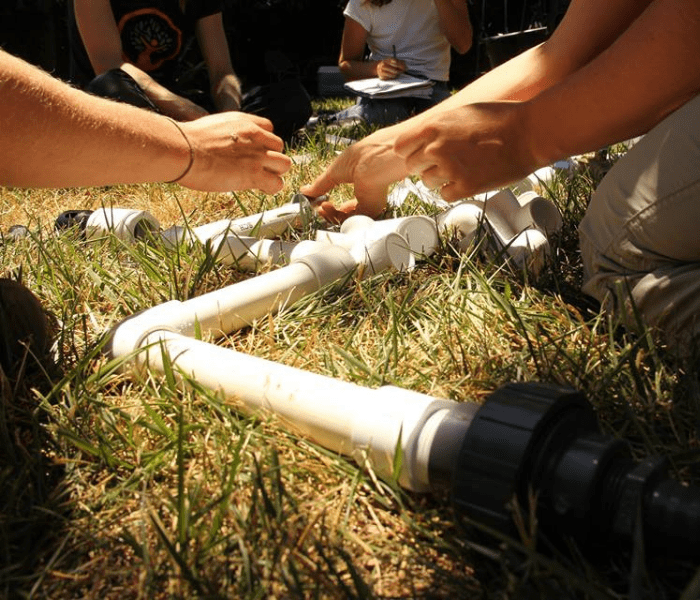
Laundry-To-Landscape (L2L) System Overview
California plumbing code defines greywater as wastewater generated from bathroom sinks, showers, tubs and washing machines. Though all of these sources represent great opportunities to transform waste to resource, the Laundry-to-Landscape system is the simplest, most cost-effective, and does not require a building permit, making it an excellent place to start!

Frequently Asked Questions (about greywater)
Other Great Sources of Info
- Water Savers — Parts and plumbing support


